

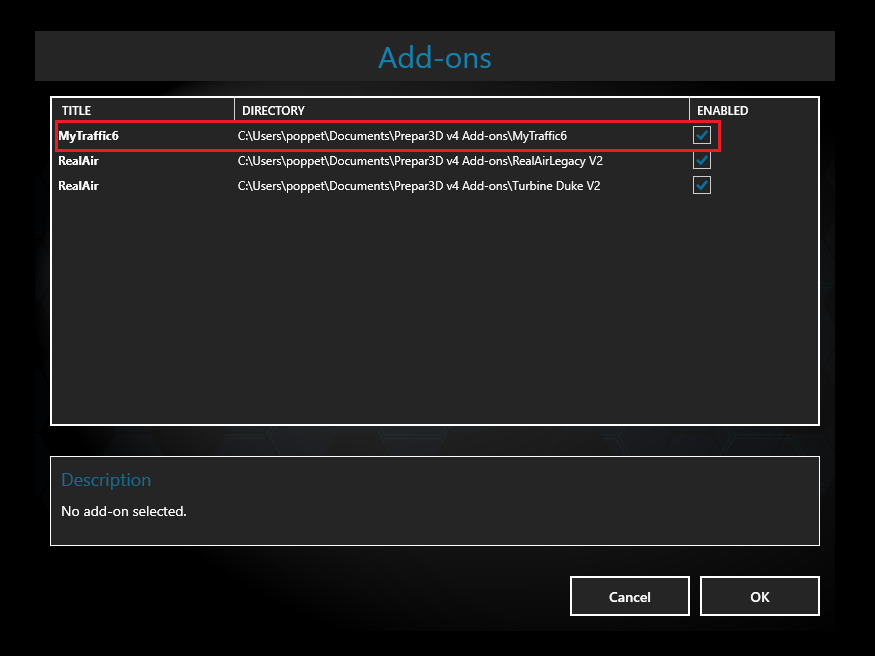
Please see the below link to set up MyTraffic 6 for Prepar3D v3 and v4 using the add-on.xml file method
http://www.prepar3d.com/forum/viewtopic ... 73#p159473
============================================================
============================================================
------
Introduction
------
A Step by Step Guide to Install and Set up MyTraffic 6a for Prepar3D
MyTraffic 6a is a Payware Traffic Add On for Prepar3D, Bringing AI Airplane Traffic to all your favorite Airports.
MyTraffic 6a is the latest Version and Compatible with all Version's of Prepar3D, V1.4 V2 and V3 (All Version of V3)
=================
You can Setup and Configure MyTraffic 6 in 2 ways.....
(1) The Official way: By using the MyTaffic 6 Communicator "MyTraffic 6 Control Panel"
(2) Manually: Not using the Communicator
==========
---
INDEX
---
(1) To Setup MyTraffic 6 the Official way Prepar3D V3
. Installing MyTraffic 6
. The Communicator (3 simple steps)
. Turning off AI traffic (Default Traffic)
. Adding the MyTraffic folder to your Prepar3D Scenery Library
==========
(2) To Setup MyTraffic 6 Manually (simobjects.cfg) Prepar3D V3
. Installing to the Default C Drive
. Installing to a Different Location
===========
(3) Possible CDT'S Crash To Desktop when using MyTraffic 6
==============
(4) To Setup MyTraffic 6 Manually for Prepar3D V2
=========================================
=========================================
* First: Before you run the MyTraffic 6a Installer (Important)
* Temporary Disable your Firewall and all Anti virus Software OR Windows Defender
* Disable UAC User Account Control, Set to Never Notify
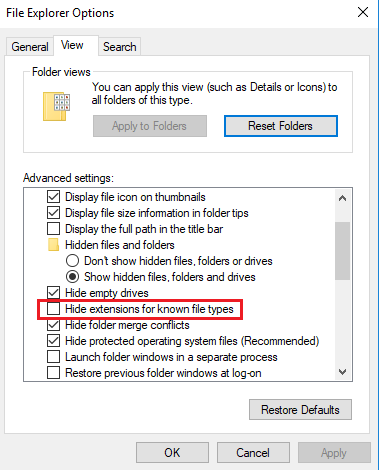
To View Images in Full Resolution, Right Click on Image < Open Image in new tab
(1) To Setup MyTraffic 6 the Official way
Installing MyTraffic 6
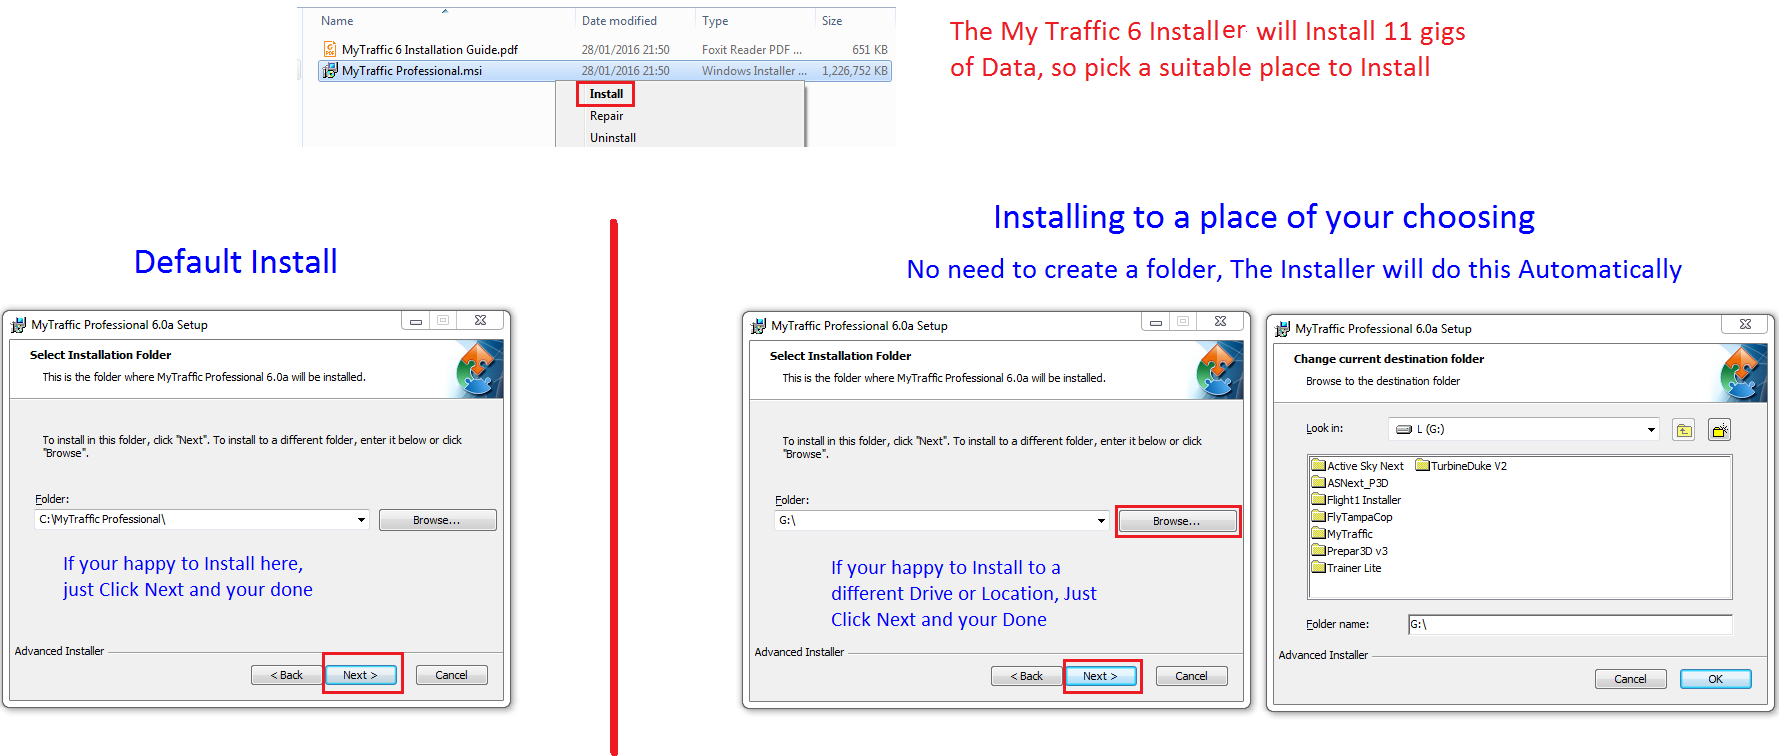
The MyTraffic 6 Installer will Install 11 gigs of Data so please pick a suitable place to Install Insuring you have enough space
Do Not Install into the Prepar3D Folder, MyTraffic 6 Installs Outside your Prepar3D folder
You can Install to the Default C Drive Or Install to any Location on you choose, The Communicator (Control Panel) will add an [Entry] to your Simobjects.cfg that will make My Traffic 6 work from any Location on your Computer.
----------
Right Click on the Installer, Click Install
============
The Communicator (3 simple steps) (setting up simobjects.cfg)
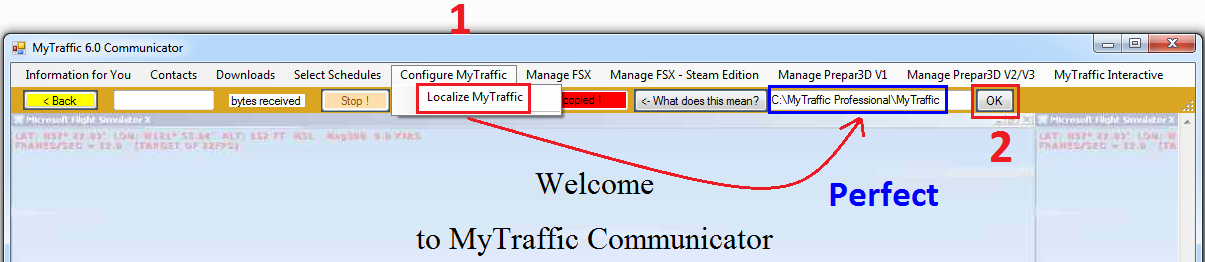
Step 1: Localize MyTraffic
When the Installation process has completed the Communicator should pop up, If not, check your Start Menu (programs) as sometimes it can be hiding in there. You can click and drag the Communicator to your Desktop
1 Click Configure MyTraffic and then Localize MyTraffic. If you have Installed to the Default C Drive, it should read.......
C:\MyTraffic Professional\MyTraffic.
If you have Installed to a different Location and Did Not create a folder it will read something like this G:\MyTraffic
2 Click Ok.
===============
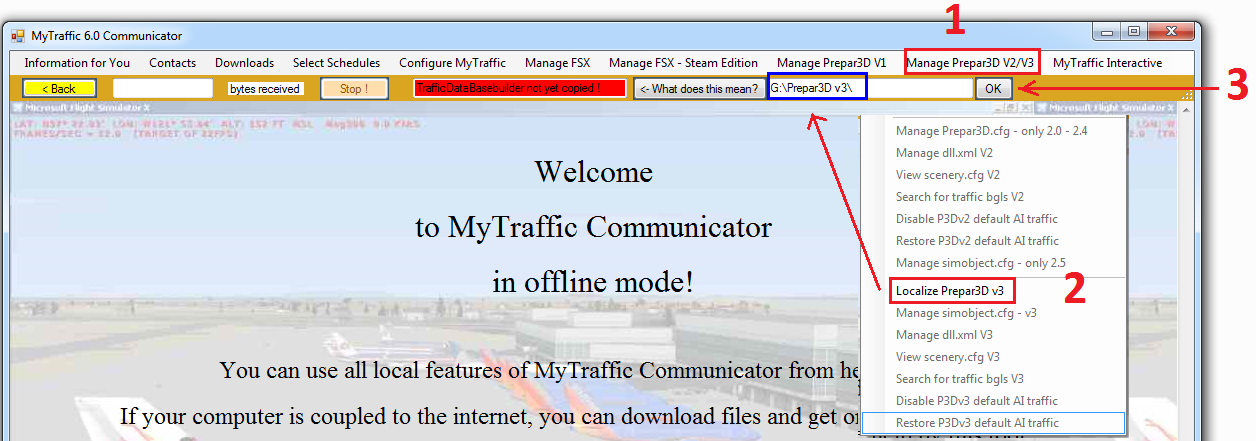
Step 2: Localize Prepar3D v3
1 Click Manage Prepar3D V2/V3. 2 Click Localize Prepar3D v3. 3 Click Ok
==================
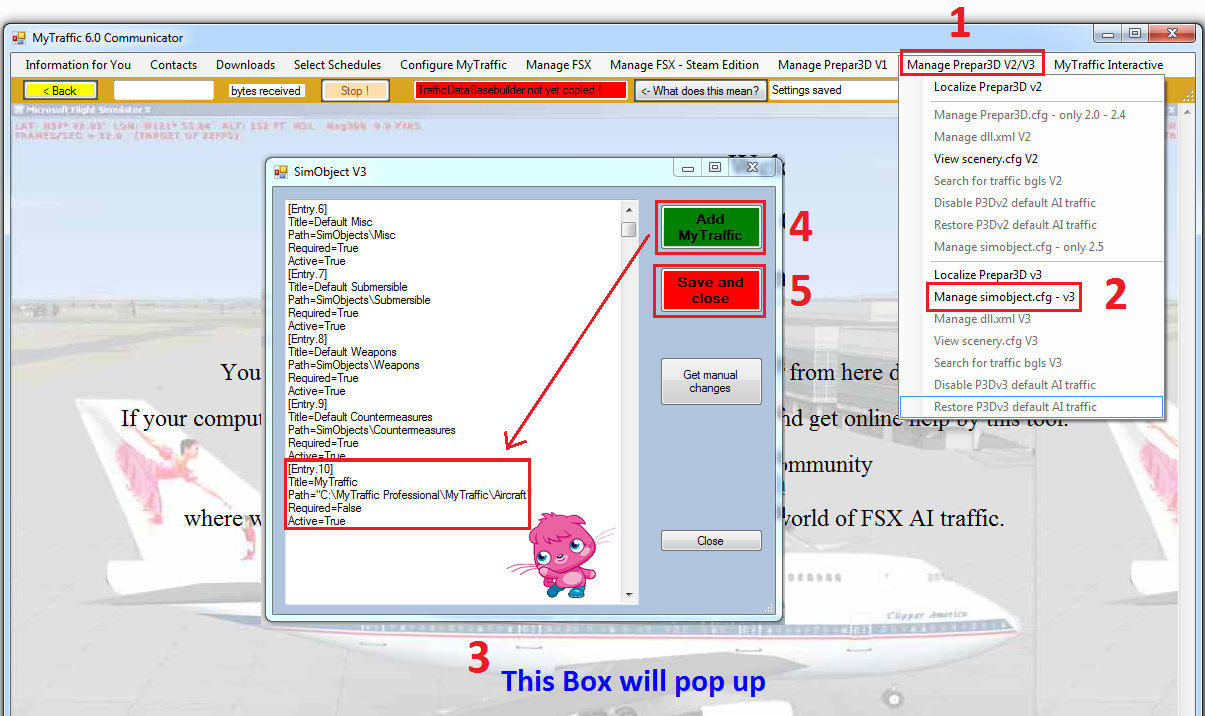
Step 3: Adding the simobjects.cfg Entry
1 Click Manage Prepar3D V2/V3 .....2 Click Manage simobjects.cfg - v3...... 3 The simobjects box will pop up.
4 Click Add MyTraffic, You will have to scroll down to see your new [Entry], and as you can see the little poppet person is confirming that I now have the proper [Entry] for my simobjects.cfg.
5 Click Save and Close
======================
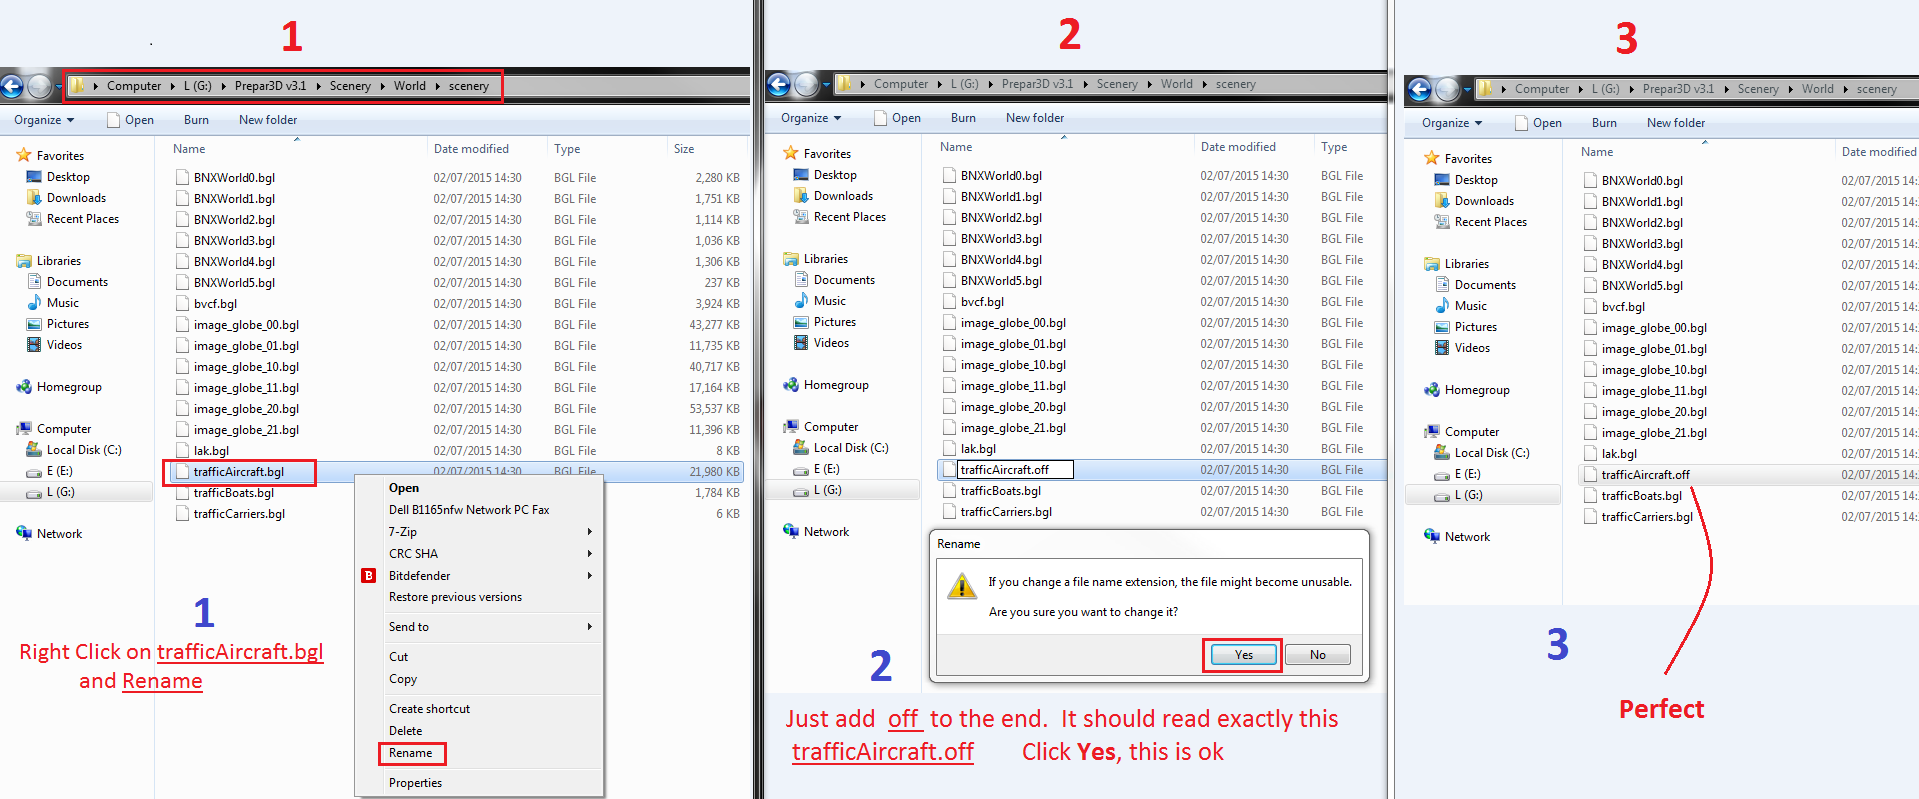
Turning off AI traffic (Default Traffic)
We will Not be needing the Prepar3D Default AI Traffic now. We can turn this off by going to Your Prepar3D V3 Install location
Follow the path: ► Prepar3D v3 ► Scenery ► World ► scenery
Follow the steps. 1 Right Click on trafficAircraft.bgl, Click Rename. 2 Remove the bgl and Add off to the end, make sure you don't delete the Full Spot. 3 What it should look like, trafficAircraft.off
======================
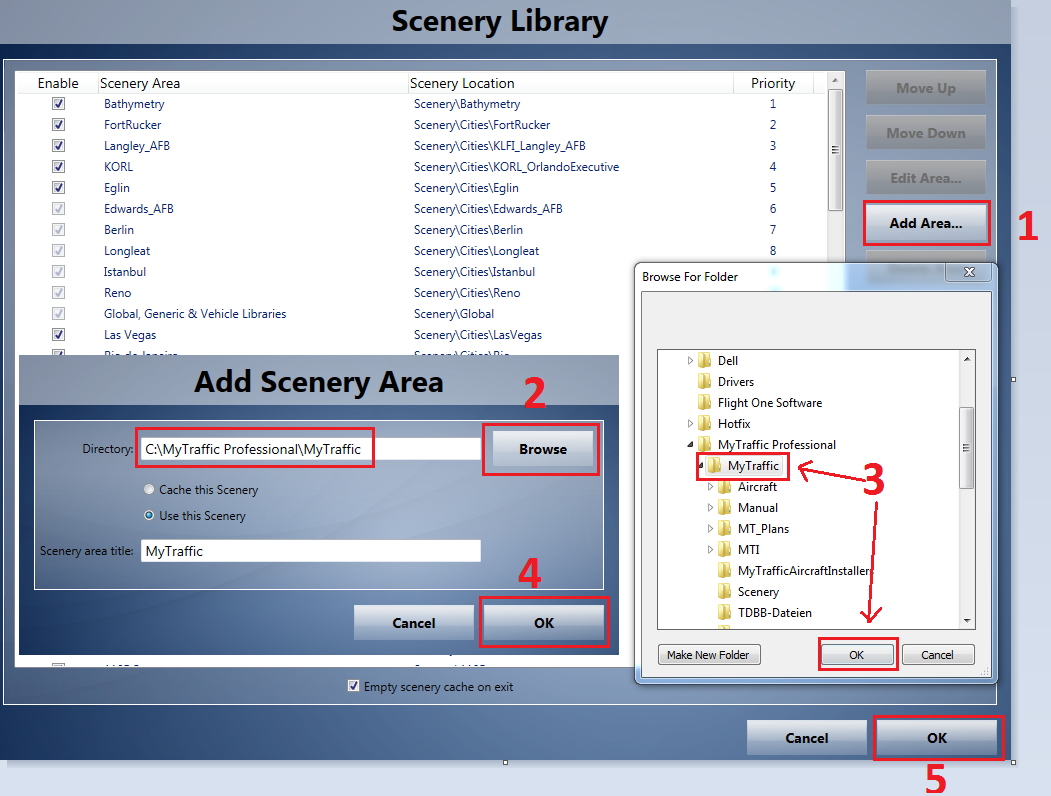
Adding the MyTraffic folder to Prepar3D Scenery Library
Launch Prepar3D. Click World (Top Left) Click Scenery Library. 1 Add Area. 2 and 3 Browse through your Drives and Click MyTraffic, this is the exact folder that you should add. 4 and 5 Click Ok
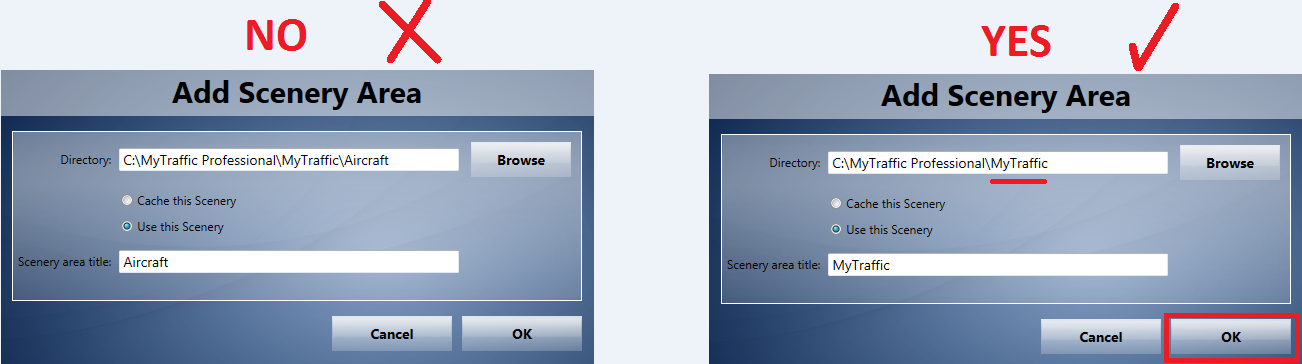
Make sure you Pick the Correct folder
The correct folder is The MyTraffic folder
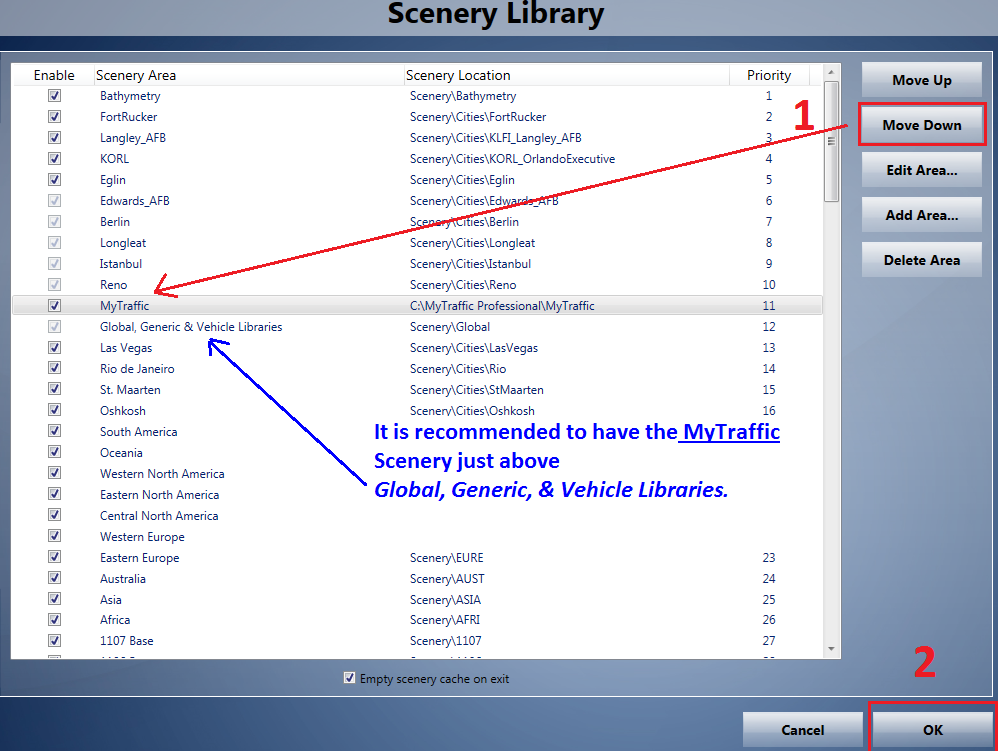
1 I will now move the MyTraffic Scenery down to just above Global, Generic & Vehicle Libraries, This is the Recommended order 2 Click Ok
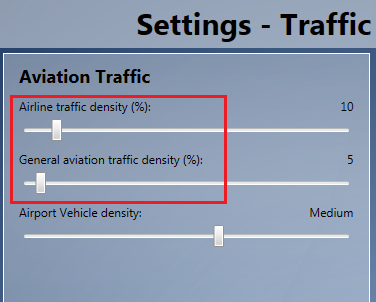
To see MyTraffic 6 Planes, You Need to adjust up your Aviation Traffic sliders in Prepar3D settings
The more you move up the Settings the more Traffic you will see. Note: High settings will have an Impact on Performance
You will know if your simobjects.cfg is set up correctly if Prepar3D is taking a lot longer to Launch to the Splash Screen
The End
==============================================================
==============================================================
(2) To Setup MyTraffic 6 Manually (simobjects.cfg) Prepar3D V3
MyTraffic 6 is Launched "Connected" to Prepar3D in 2 ways, Your Simobjects.cfg and through your Prepar3D Scenery Library
Below are steps to setup your Simobjects.cfg Manually
Note: You will still have to add your MyTaffic folder to your Prepa3D Scenery Library and Turn Off Default Prepar3D Traffic.
------------------
Manually setting up your simobjects.cfg
Installing MyTraffic 6 to the Default C Drive.........
After you Install MyTaffic 6, The communicator "MyTraffic 6 Control Panel" will pop up, Close it we will not be using it. We will now add an Entry to your simobjects.cfg
The Default Install folder Location for MyTraffic 6 is C\MyTraffic Professional
Your Path in simobjects.cfg will be this Path=C:\MyTraffic Professional\MyTraffic\Aircraft
It will look like this in your Simobjects.cfg
[Entry.10]
Title=MyTraffic Vehicles
Path=C:\MyTraffic Professional\MyTraffic\Aircraft
Required=False
Active=True
If you have Installed MyTraffic 6 to the Default Location, You can Copy and Paste the above Entry to Your simobjects.cfg
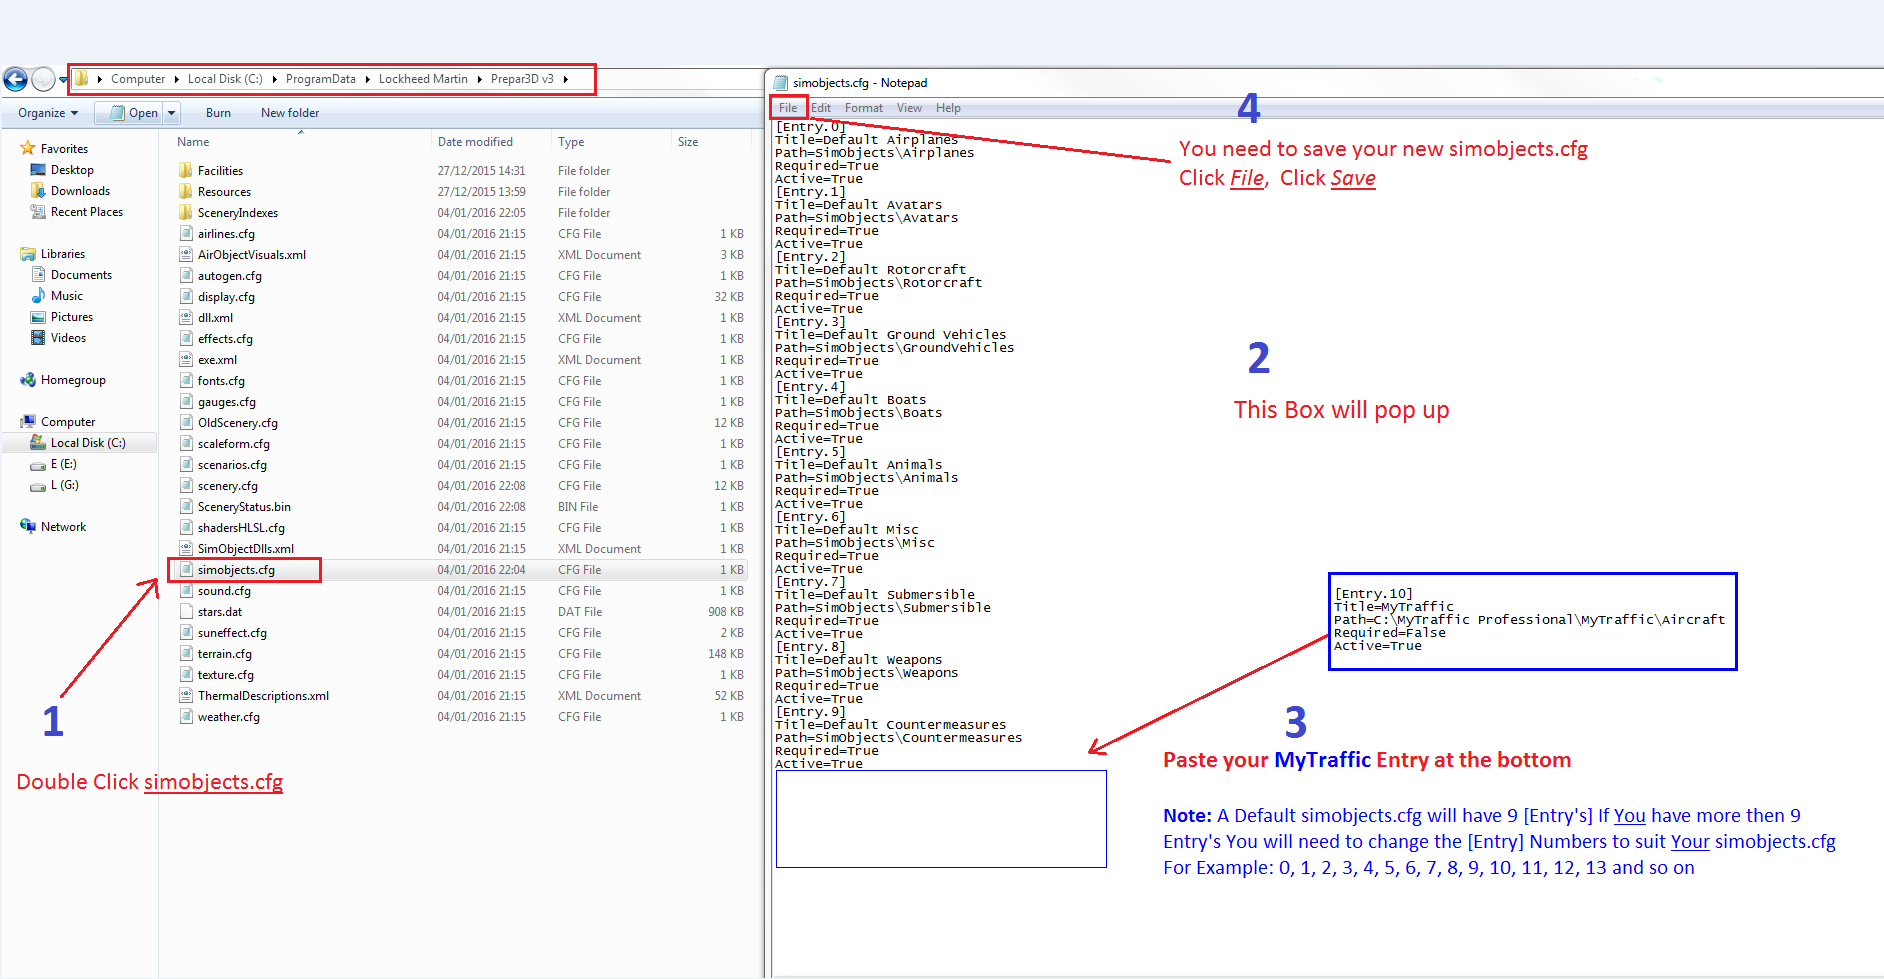
Go to ► Computer ► Local Disk (C:) ►ProgramData ► Lockheed Martin ► Prepar3D v3 simobjects.cfg
Follow the steps in the image below. 1 Double Click on simobjects.cfg to Open. 2 Your simobjects Note pad will pop up. 3 Add your new Entry in at the bottom. 4 Go to File and Click Save
Pay attention to the correct Numbering order in the Image, Read the Tex
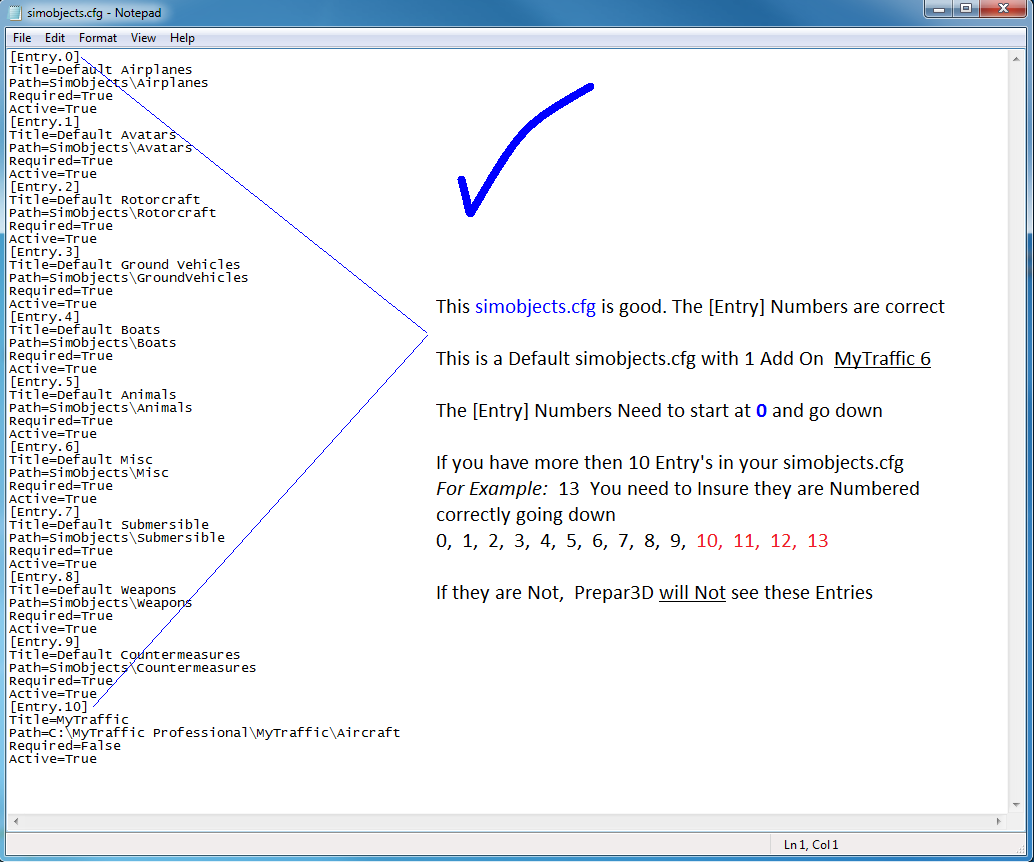
I have now added the MyTaffic 6 Entry to my simobjects.cfg
As you can see from the Image this is a Default simobjects.cfg with 1 Add On MyTraffic 6
If you have more then a Default 9 Entry's in your simobjects.cfg, You need to change the [Entry] Number to suit Your simobjects.cfg. The Entry Numbers Start at 0 and go down, If the Numbers are Not correct Prepar3D Will Not see your new [Entry] and MyTraffic 6 Will Not Launch
===========================
. Installing MyTraffic 6 to a Different Location
Important Question:
If you Installed MyTraffic 6 somewhere else as apposed to the Default location, did you Create a folder to Install MyTraffic 6 to ? What did you name this folder ?
This is important because this extra folder extension will change the folder path= in your simobjects.cfg !
For Example: I am now Installing MyTraffic 6 and have decided to Install to my G Drive, I will Create a folder called MyTraffic6 and point the Installer to it Note: Notice how i left No spaces when i named this folder!!
You need to spell the Name of the folder you created exactly the same including the spaces in your simobjects.cfg, If you are even one digit or space out MyTraffic 6 Will Not Launch
--------------------------
Not creating a folder to install to
If you have Installed Mytraffic 6 to a Different location and Not the default Location, The MyTraffic 6 Installer will Automatically create a folder called MyTraffic
Your simobjects.cfg Path will be Path=X:\MyTraffic\Aircraft You will have to change the folder Letter to suit your Install Path.
I left an X in my path, Change this X to suit your Install Path
[Entry.10]
Title=MyTraffic Vehicles
Path=X:\MyTraffic\Aircraft
Required=False
Active=True
You will know if your simobjects.cfg is set up correctly if Prepar3D is taking a lot longer to Launch to the Splash Screen
Note: You will still have to add your MyTaffic folder to your Prepa3D Scenery Library and Turn Off Default Prepar3D Traffic.
The End
==============================================================
==============================================================
(3) Possible NTDLL.DLL Errors CDT'S when using MyTraffic 6
Some users are reporting NTDLL.LL crashes when using MyTraffic 6. If you are exeriancing these CDT'S It is recommended to Disable The Military aircraft in your MyTraffic scenery folder
You can Disable Military aircraft and then check to see if this solves your issue
Go here: Local Disk ► MyTraffic Professional ►MyTraffic ►Scenery
Locate this file MyTrafficmil.bgl
Rename this file to MyTrafficmil.bgl.orig This will Disable Military aircraft
The End
==============================================================
==============================================================
(4) To Install MyTraffic 6 for Prepar3D V2
This is the very same procedure as Prepar3D V3 Adding an Entry to your simobjects.cfg + adding your the MyTraffic folder to Prepar3D Scenery Library
Setting up your simobjects.cfg
By Default you will have 8 Entry's in your simobjects.cfg. If you have Installed MyTraffic 6 to the Default C Drive.....
Your Entry will look like this
[Entry.9]
Path=C:\MyTraffic Professional\MyTraffic\Aircraft
Go to ► ProgramData ► Lockheed Martin ► Prepar3D V2 Double Click on simobjects.cfg to open
If you have Installed MyTraffic 6 to the Default C Drive you can Copy and Paste the above Entry into your simobjects.cfg.
When added to your simobjects.cfg, it will look like this. This is a Default simobjects.cfg with 1 Add On Mytraffic 6
[Entry.0]
Path=SimObjects\Airplanes
[Entry.1]
Path=SimObjects\Rotorcraft
[Entry.2]
Path=SimObjects\GroundVehicles
[Entry.3]
Path=SimObjects\Boats
[Entry.4]
Path=SimObjects\Animals
[Entry.5]
Path=SimObjects\Misc
[Entry.6]
Path=SimObjects\Submersible
[Entry.7]
Path=SimObjects\Weapons
[Entry.8]
Path=SimObjects\Countermeasures
[Entry.9]
Path=C:\MyTraffic Professional\MyTraffic\Aircraft
You will know if your simobjects.cfg is set up correctly if Prepar3D is taking a lot longer to Launch to the Splash Screen
Note: You will still have to add your MyTaffic folder to your Prepa3D Scenery Library and Turn Off Default Prepar3D Traffic. ( See above Instructions to do this)
