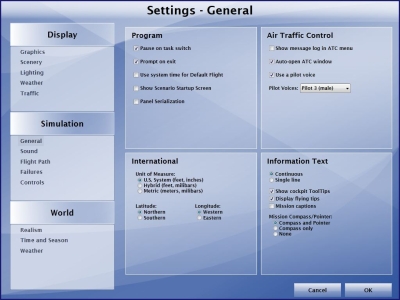
General settings allow you to change general program options, air traffic control options, Mission options, and international settings.
To open the General Settings dialog box
- On the Options menu, point to Settings and then click the Simulation tab and then on the General page.
Program Settings
Pause on Task Switch
Select the Pause on task switch option if you want to pause when you switch to another application. When you switch back to the simulator, you must press the P key to resume the flight.
If you don't select this option and you switch to another application, your flight will continue behind the scenes until you task switch back to the simulator (or until you crash).
To pause the simulator automatically when task switching
- In the General Settings dialog box, select the Pause on task switch check box.
- Click OK.
Prompt on Exit
If you select Prompt on exit and you choose to exit the simulator (by clicking the "X" button in the upper right of the main screen, or choosing Exit from the Flights menu), you will be prompted to confirm that you want to exit. If you clear this setting, the application exit without confirmation.
To be prompted when exiting the application.
- In the General Settings dialog box, select the Prompt on exit check box.
- Click OK.
Use system time for Default Flight
System time refers to the time currently set on your computer's clock. If you select this setting, any flight in that loads as the Default Flight will start at the time of day currently set in your computer's clock.
To change how the simulator displays time
- In the General Settings dialog box, select the Use system time for Default Flight check box.
- Click OK.
Show Scenario Startup Screen
You have the option of displaying the Startup Screen when you first launch Prepar3D.
To show the Startup Screen on launch
- In the General Settings dialog box, select the Show Scenario Startup Screen check box.
- Click OK.
Panel Serialization
You have the option of saving the panel configuration on your aircraft. This creates a .pnl file that saves with your flight.
To save the panel configuration
- In the General Settings dialog box, select the Panel Serialization check box.
- Click OK.
Air Traffic Control Settings
Customize the air traffic control settings for more realism and to use a voice that you like.
Show ATC Text
As air traffic control messages are sent, they are audible and display as text in the ATC console. Some virtual pilots prefer to only listen to air traffic control and not see the text onscreen.
To display ATC messages as text onscreen
- In the General Settings dialog box, select the Show message log in ATC menu check box.
- Click OK.
Auto-open ATC Window
By default, the ATC window is opened automatically when messages are sent or when a response is required from the pilot. Some pilots prefer that the ATC window remain hidden until they want to open it manually; others want it to appear automatically.
To have the ATC window appear automatically
- In the General Settings dialog box, select the Auto-open ATC Window check box.
- Click OK.
Use a Pilot Voice
You'll hear three different kinds of voices in the simulator: the pilot voice (which represents you), the ATC controller's voice, and the voices of other pilots talking on the same frequency. Some pilots prefer to hear only the ATC controller voice and not their pilot voice. You can turn off the pilot voice (although you'll still hear the controller and the pilots in other aircraft).
To turn off the pilot voice
- In the ATC Settings dialog box, clear the Use a pilot voice check box.
- Click OK.
You can choose from ten voices to use as your pilot voice. If the Use a Pilot Voice check box is not selected in the ATC Settings dialog box, you can't choose a pilot voice and you won't hear a voice when you send a message to ATC.
To choose a pilot voice
- In the General Settings dialog box, select the Use a pilot voice check box.
- In the Pilot voices list, select the voice you want to use as your pilot voice.
- Click OK.
International Settings
Use the International settings to set the system of measurement used and the basis for your coordinates. These settings define the system of measurement used throughout the application. The default setting is the U.S. system.
Unit of Measure
To select the unit of measurement
- In the General Settings dialog box, select a setting in the Unit of measure list.
- Click OK.
| Unit of measure | Effect |
|---|---|
| U.S. System | All measurements in U.S. standards. |
| Metric (altimeter feet) | All measurements in metric except for the altimeter. |
| Metric (altimeter meters) | All measurements in metric including the altimeter. |
Selecting Latitude and Longitude Preferences
If you frequently use the in-simulator map, and you set your position by typing the coordinates into the latitude and longitude boxes on the map dialog box, you may want to adjust the Latitude and Longitude settings in the International Settings dialog box. This will depend on where you're flying in the real world. By default, the latitude is set to the Northern Hemisphere and longitude is set to the Western Hemisphere. When the settings are configured this way, you can type in coordinates on the map dialog box without typing "N" for north and "W" for west. If you're flying in the Southern Hemisphere or Eastern Hemisphere you'll have to type "S" before the latitude value and "E" before the longitude value.
To change the latitude and longitude settings
- In the Latitude list, select the Northern or Southern Hemisphere.
- In the Longitude list, select the Western or Eastern Hemisphere.
- Click OK.
Features Affected by International Settings
The list below details some of the features affected by changes in international settings.
Displayed in meters or feetAutopilot: Altitude Hold
Autopilot: Vertical Speed Hold
Flight Analysis: Vertical Analysis Graph, Altitude
Map: Altitude
Weather: Clouds, Layers
Weather: Wind, Layers
Weather: Temp / Pressure, Layers
Weather: Visibility, Layers
Displayed in millibars or inches of mercury (Hg)
Weather: Temp / Pressure, Barometric Pressure
Displayed in Celsius or Fahrenheit
Weather: Temp / Pressure, Temperature
Displayed in kilograms or pounds
Fuel Settings: Fuel quantity
Fuel Settings: Fuel weight
Displayed in liters or gallons
Fuel Settings: Fuel capacity
Displayed in kilometers or miles
Navigation Log: Distance
Navigation Log: Fuel
Navigation Log: Waypoint altitude
Information Text Settings
When flying Missions, you can choose from several display options. You may choose to display captioning for the voiceover, text preferences, cockpit ToolTips, flying tips, and whether to use the Mission pointer and compass together or not at all.
To select text preferences
- In the General Settings dialog box, select either Continuous for a continuous block of text or Single Line for a single line of scrolling text.
- Click OK.
ToolTips provide useful cockpit information. When you select this setting, anytime you point to a vehicle panel feature, you'll see a ToolTip with information about that feature. The ToolTip provides the name of the feature and, for some panels, the current readout for that instrument, switch, or gauge. For example, if you point to the altimeter on a panel that has dynamic ToolTips when the Vehicle is flying at 2,000 feet, the ToolTip text will read "Altimeter 2,000 ft."
ToolTips display in metric units if you select metric International settings. If you do not select Show cockpit ToolTips, ToolTips will not appear. Note that you must be in cockpit view or virtual cockpit view to see ToolTips.

To display cockpit ToolTips
- In the General Settings dialog box, select the Show cockpit ToolTips check box.
- Click OK.
Flying tips are onscreen text that appear during a flight to prompt you take an action. For example, if the altimeter's Kollsman window has the wrong barometric pressure, a Flying Tip will remind you to set the correct pressure by pressing B.
To display flying tips
- In the General Settings dialog box, select the Display flying tips check box.
- Click OK.
To display voiceover captioning in Missions
- In the General Settings dialog box, select the Mission captions check box.
- Click OK.
To display the compass and pointer in Missions
- In the General Settings dialog box, choose an option in Compass/Pointer list.
- Click OK.