During installation, the setup program automatically chose the best overall display settings for your computer's hardware. Display Settings allows you to customize the simulator to look and perform the way you want it to. You may want to display higher detail in airports and cities, or you may want greater definition in mountains and valleys. You can also choose whether to display special effects and shadows.
Depending on your computer, display settings may affect performance. Experiment with the settings to find the combination of performance and appearance that you like best.
The Display Settings page includes five tabs: Graphics, Scenery, Lighting, Weather, and Traffic.

Open scenery settings tab
- On the Options menu, point to Settings, and then click Display.
- Click the Scenery tab.
Global Scenery Quality
Use the Global settings option to adjust the overall quality of the scenery. Higher settings offer better-looking graphics, but may affect performance.
To increase overall scenery quality
- On the Display Settings Scenery tab, select a setting from the Scenery Global Settings drop-down
- Click Accept.
Terrain and Water Detail
Level of Detail Radius
Drawing fine-detail scenery in the distance can create a greater sense of immersion and realism, but this may come at a cost in performance on some computers.
Drawing scenery in the distance places a demand on your computer's graphics resources. By setting a lesser distance at which details are drawn, you free up computer resources for other graphics tasks.
To adjust the detail radius
- On the Display Settings Scenery tab, move the Level of detail radius slider to the right or left to increase or decrease the distance at which scenery is drawn in detail.
- Click Accept.
Terrain Tesselation Factor
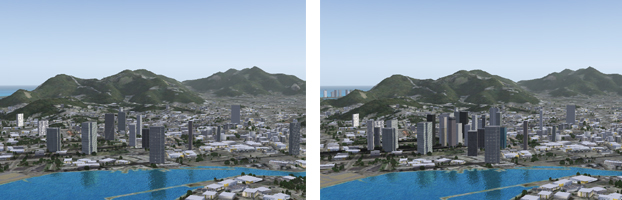
The hills, valleys, mountains, and canyons are drawn using real-world digital elevation data. The mesh includes a map of points at different elevations. The more points that get drawn at any time, the more detail in the terrain, and the more computing power required.

Higher settings include more points; lower settings drop less-significant points. In the two pictures above, note the difference of the Tesselation Factor at low (left) and high (right). Increasing the Tesselation Factor settings to ultra may affect your computer's performance.
To adjust the tessealtion factor
- On the Display Settings Scenery tab, move the Tesselation Factor slider to the right or left to increase or decrease complexity.
- Click Accept.
Mesh Resolution
This slider increases or decreases the level of detail in the terrain mesh. At the highest settings, the terrain mesh includes elevation data down to one meter resolution. At the lowest settings, the terrain mesh includes elevation data every 4.9 kilometers. Obviously, the higher setting will display a great deal more detail so you can recognize small terrain features in your area of the world quite easily.
To adjust mesh resolution
- On the Display Settings Scenery tab, move the Mesh resolution slider to the right or left to increase or decrease detail.
- Click Accept.
Terrain Texture Resolution
Textures on the ground include roads, rivers, fields, shorelines, water, and the textures underlying cities. When you fly at high altitudes, the difference between high and low Texture resolution settings becomes unnoticeable. High settings (2 meters to 7 centimeters) make flights at low altitude more realistic and interesting.

Notice how sharp and detailed the fields are in the picture on the right, using a high Texture resolution setting.
To adjust texture resolution
- On the Display Settings Scenery tab, move the Texture resolution slider to the right or left to increase or decrease detail.
- Click Accept.
Water and Bathymetry
Note: Not all video cards support water effects. If your video card does not support these effects, you will not see water effects in the simulator even when this slider is moved to the right.
Dynamic Water
Displaying water in Prepar3D has become more realistic than ever. With the addition of three-dimensional dynamic water, any water environment such as a lake or an ocean, will appear vibrant and react to wind speed and weather conditions. At the ultra water detail setting, the water reacts to the tesselation factor and mesh resolution settings just as they would on any other texture.

The 3D living water can react to wind speed and different weather conditions that the user applies. For example in high wind environments, the waves on the surface will react more turbulently than they would on a low breeze day. The following image was taken with high wind settings applied.

Water settings UI screen

To adjust water detail
- On the Display Settings Scenery tab, move the Water Detail slider to the right or left to increase or decrease detail. The ultra setting enables three-dimensional dynamic water.
- Click OK.
To adjust water effects
- On the Display Settings Scenery tab, check the desired Reflections and Bathymetry check boxes.
- Click OK.
Reflections: These check boxes determine what scene elements are reflected in the water surface. Higher settings will increase realism but will also lower the framerate.
Bathymetry: This check box enables underwater elevations. Enable this setting for underwater training scenarios.
Land Detail Textures
These are land textures that are engineered to give the appearance of greater detail.
To display high-detail textures
- On the Display Settings Scenery tab, select the Land detail textures check box.
- Click Accept.
Scenery Objects Detail
Scenery Complexity
Scenery complexity affects the density of non-autogen buildings and scenery objects like monuments, custom buildings in cities and airports, or any object that requires non-generic models or non-generic textures.
The picture above on the left shows a city with sparse scenery complexity. Notice the difference in the picture on the right, which has very dense scenery complexity. Higher settings may affect simulator performance on some computers.
To adjust scenery complexity
- On the Display Settings Scenery tab, move the Scenery complexity slider to the right or left to increase or decrease density.
- Click Accept.
Autogen Density
Autogen creates generic scenery objects, such as trees and buildings. The objects appear in the distance as you approach them.

The picture above on the left shows the minimum autogen setting; the picture on the right displays the maximum autogen setting. Note the greater number of trees and buildings in the picture on the right. Higher settings may affect simulator performance on some computers.
To adjust autogen density
- On the Display Settings Scenery tab, move the Autogen density slider to the right or left to increase or decrease density.
- Click Accept.
Ground Scenery Casts Shadows
Buildings and other ground objects can cast shadows. Selecting this setting may decrease performance on some computers.
To see ground objects cast shadows
- On the Display Settings Scenery tab, select the Ground scenery cast shadows check box.
- Click Accept.
Special Effects Detail
The Special effects detail feature manages effects like smoke, fountains, and fireworks that are created using units called sprites. The more sprites displayed, the better the effect looks, but higher settings may decrease performance on some computers.
To see effects details
- On the Display Settings Scenery tab, move the Special effects detail slider to the right or left to increase or decrease density.
- Click Accept.
Resetting Default Values
You can easily return to the default display settings at any time.
To reset the display settings on any tab
- On the Display Settings Scenery tab, click Reset Defaults.